Creating Useful Wood Projects, Both Large and Small
Hammond Organ Cabinet Construction
Written by on January 12, 2017
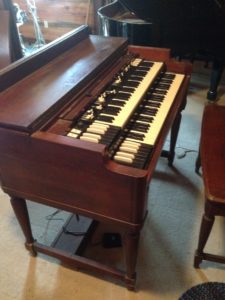
MY ORIGINAL HAMMOND B3 ORGAN
Lets start by showing a picture of the Hammond B3 that I bought when I was 16:
 I decided to approach the project with the idea of having the main body separate from the leg structure. One more thing (which many church organists find abhorrent) is that I have never used the bass pedals. You can see in the photo that the pedals are not in place. Rock bands cannot use pedals, since the majority have a bass guitar player. Two basses clash terribly, and its never been my desire to use them. The project could still be easily adapted to using pedals however.
Anyway, the whole idea of the build is to decrease WEIGHT. These organs used solid core plywood, which is very heavy. I decided to go with local cypress, which can be very light in some cases. Some boards are lighter than others I’ve found, and so I’ve selected those which were. Another factor to reduce weight concerns the omission of the pedals. The metal area along the bottom board where they connect is heavy, and so I won’t be having that extra weight. I’m adding in a matching piece in the front area of the lower board which connects to the pedals. Also, the tube preamp inside can be replaced with a digital unit from Trek II. That helps lose about 10 more pounds. It all adds up in this project.
Let me mention something very important here. Today, a digital preamp is available which can add percussion and reverb to older Hammond organ models made prior to the introduction of the B3, C3, and A100 series. This enables the older models to have all the features of the later model B3, including percussion. This is a great thing to present itself in order to save some of these older working organs by breathing new life into them. This could add another 50 years of use to something potentially headed to a landfill. Its an enormous win for all!
The first organ that I found as a donor is a model CV. I drove to Nashville to pick it up from a fellow who decided to give up on his proposed refurbish job. Long story short, I bought it in pieces. I’ve since had to find another CV in order to have an example of where all the wires should reconnect, (It may well become portable project #2!) I don’t know if I’ll get much into the electronics of the thing here, since I’m concerned mostly with the wood cabinet construction and portability. I can do mechanical things, but diagnosing electronic problems ain’t one of them.
After doing a lot of internet searching, I believe that I can manually handle the main body inside a flight case by turning it on its end, and bring it up and down stairs using a dolly made for moving refrigerators. It won’t be quite that bulky, and I think fairly manageable. The other flight case for the legs and base will be a smaller thickness, but basically the same length and width of the body, and can sit on the main body flight case (which has casters) for moving around. I plan on using a cheap Harbor Freight lift table to maneuver under the main body to lift it up in order to install the legs. You’ll get the idea as we go along. I just want to be able to set it up quickly and by myself.
By going to all this effort, I can once again enjoy the feel of playing my REAL B3 with a tone generator, and not rely on the fellows to move it around. And the audience will have no idea that what they are seeing is anything but the real thing. This would beat any other portable idea that I’ve come across.
So it’s finally time to start the cabinet.
0 Responses to Hammond Organ Cabinet Construction
Comments are closed.