Creating Useful Wood Projects, Both Large and Small
Hammond Organ Cabinet Construction
Written by on January 12, 2017
HAMMOND B3 CASE CONSTRUCTION
I began the construction of the main body of the organ by first selecting some nice 2″ thick stock. I ventured over to one of my buddy’s shop to plane it down to 1 3/4″, the finished thickness of the original. I also squared up some 1 3/4″ x 1 3/4″ stock to use as the corner posts. They actually will serve a good purpose for me since I’m using solid stock on the ends vs. the solid core plywood the originals had. The plywood on the originals would not warp over time, but solid stock can. The corner posts help prevent this on my case. The posts on the original were there to most likely cover the exposed ends of the plywood for a finished look. Here’s a picture of the stock I’ve squared up:
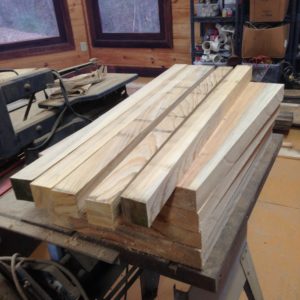
It’s enough for two cabinets. I’ve tried when I could to make a duplicate part since I plan on doing a second cabinet to house the other organ I found. Anyway, after cutting the sides to the correct length, I used my old stanley doweling jig to make holes for some 1/2″ dowels to reinforce the joint. Here’s a photo of that:
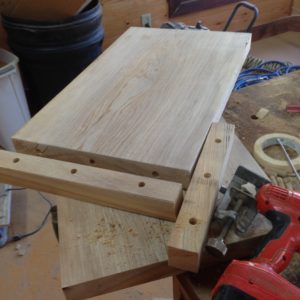
You can see the old doweling jig I’ve used for forty years on the right of the stock. I went ahead and glued up the two ends to the corner blocks. Before I did though, a ran a very small saw cut that is between the corner posts and the sides. It’s only about 1/16″ wide x 1/16″ deep. I don’t know why they decided to accent that line, but it’s there. So I did the same thing. Here’s a picture of the original. If you look closely, you can make it out: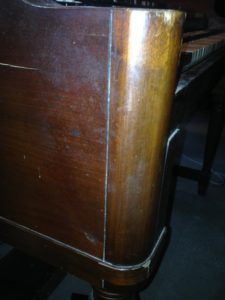
I didn’t take a picture of the end glueup unfortunately. The next step was to make a template of the cutout on the top above the manuals. There is a veneer applied on that rounded area. I’ll bet they used it to cover, once again, the rough edges of the plywood ends. But to carry through the authentic look of mine, I thought it necessary to do the same. Folks would see a difference by noticing the top grain of my corner posts being different from the end pieces.
After cutting out the two offsets and sanding them, it was time to make and apply the veneer. I found some thick stock and cut a few thin slices to use. I then sanded both sides until I was happy with the look. It ended up a bit over 1/16″ thick and 1 3/4″ wide. I took the piece to the kitchen and placed it in a pot of boiling water far enough to hit the part I needed to bend. After about 30 minutes, I took it quickly to the shop and, using the waste piece that I had saved from the offset cuts, clamped it up after gluing. It bent well and did not break! I was a happy boy. Here’s a photo of that:
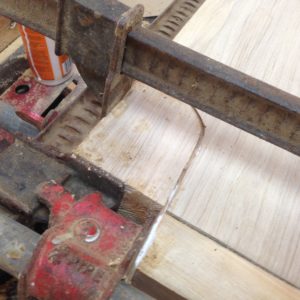
It looks like the waste piece on this glueup had separated after I cut it out, but that was no problem. I just gently clamped it on with no backing since it was straight anyway. After drying overnight, I removed the clamps and sanded the area. It turned out great!
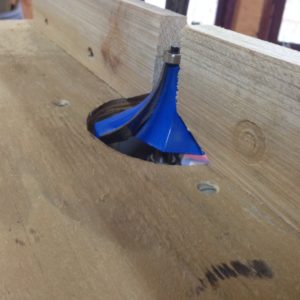
The next thing to do was to round the corners. I ordered a special large diameter router bit to do the job. Large bits have to run at a lower speed than your typical smaller router bits, and fortunately for me, my kids had given me a router for Christmas recently that fit the bill perfectly! It accepts 1/2″ as well as 1/4″ router bits, and also had variable speed. It was perfect. I quickly made a small router table to mount it in, and placed the large bit in place. It worked well:
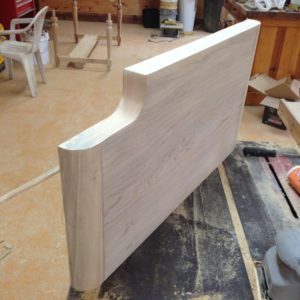
After rounding the corners, I took a couple pictures of the outside and inside of the ends. You can see on the inside view, a small mortise cut near the front that needs to be precisely positioned. (More on that in a bit.) This is to accept the front rail which runs side to side just in front of the lower manual. I’ve run across folks tearing these cabinets apart for repair and saw that as the correct joint. So here’s a look at the front and back view:
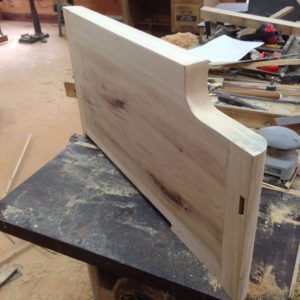
You can see in the bottom photo above, a recess to accept the bottom. I sawed most of it out with my table saw, and hand chiseled the ends for a nice fit. The front of the rabbet is slightly angled. The kneeboard on the Hammond is on an angle, and the front of the bottom follows that angle. The bottom of the case therefore has an angle cut on the front to brace that kneeboard for a nice joint.
0 Responses to Hammond Organ Cabinet Construction
Comments are closed.